You can take creepy photos of anything with the help of moody lighting, scary locations, and props. Here are some of our Halloween photography tips.
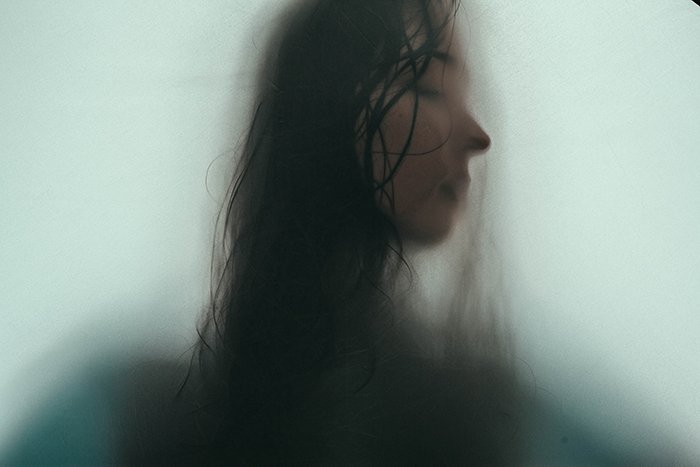
1. Halloween Photography: Shoot Through Fabric to Create Ghostly Silhouettes
For this Halloween-inspired picture, I used a light diffuser. The material is very light and soft, which makes it perfect for abstract silhouettes. You can use a similar material to photograph objects and animals. You can also use curtains or large sheets of paper. When you shoot through a semi-transparent material, everything on the other side looks ghostly. This is an easy way to make any Halloween photography portrait look creepy and surreal. Make sure you shoot against a bright light source. The brighter it is, the more the silhouette will stand out. If your model touches the material, their face will be more visible. Feel free to experiment with different poses and expressions.
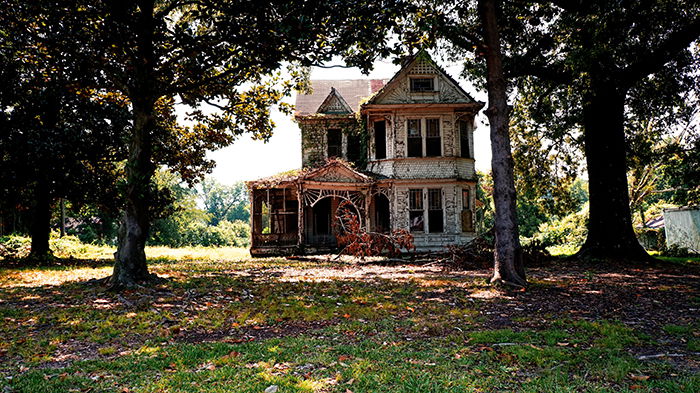
2. Take Photos in Abandoned Places to Set the Mood
This abandoned house would look even spookier if it were dark outside. For perfect Halloween photography results, take photos when it’s cloudy or gloomy. Make sure there’s enough light for you to sharply photograph your subject. Try taking Halloween photography during the blue hour for a haunting blue effect. Find a location that complements your theme. The right location and weather will set the mood for your entire photoshoot. If you’re taking portraits, your model might find it easier to pose in a location that gives them strong Halloween vibes. If you don’t have a theme, you can use simple Halloween-related terms like:
abandoned hospital ghost stories getting lost; or pumpkin patch.
Once you have a theme, you can find an appropriate location. You should stay away from old houses or anything that could hurt you. If you find an abandoned building, don’t go inside. You can still get fantastic Halloween photography results if you take photos next to a building.
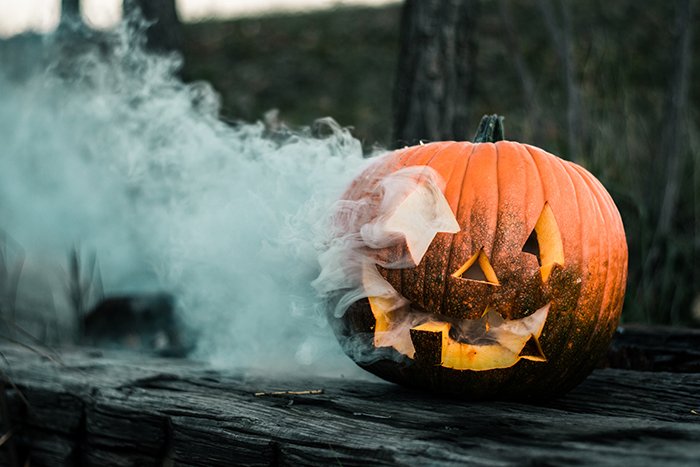
3. Take Your Halloween Photography to the Next Level with Fun Photography Tools
For unique Halloween images, put a smoke bomb in a jack-o’-lantern. This will make it seem like there’s a ghost leaving the pumpkin! Perfect for fun family photoshoots. Carved pumpkins, fake blood, and candles are all a normal part of Halloween. If you photograph them on your own, you’ll get Halloween pics that are beautiful but not original. To take your still life Halloween photo to the next level, you can use cheap photography tools. Here are a few ideas:
Smoke bombs: These handy tools come in every color imaginable. You can combine Halloween colors, like black and orange, to make any still life photo pop. Put smoke bombs in pumpkins, hats, and anything else that deserves to look spookier. (Avoid using smoke bombs indoors or in places with flammable objects.) Bokeh filters: You can either buy these online or make them yourself. Bokeh photography filters change the shape of bokeh into anything you like. For a fun Halloween shoot, you can use bat, pumpkin, and ghost filters. Cling film: Cover your lens with plastic wrap. You can crumple it up to create more texture. This will create a blurred effect that’s perfect for surreal Halloween photography.
4. Capture Creepy Movements with Motion Blur
Halloween is often associated with ghosts. You can take advantage of this theme with the help of motion blur or long exposure photography. Place your camera on a tripod and take photos with a slow shutter speed. The slower it is, the blurrier your image will look. This is a great way to capture different movements and make your Halloween photo look abstract. For a stronger effect, don’t use a tripod. You can use motion blur techniques like panning and zooming to give your pictures an eerie feel.
5. Desaturate Your Photos to Make Them Look Scarier
If you look up spooky Halloween photography online, you’ll notice that most of them aren’t that colorful. The older a photo looks, the spookier it becomes. If you want inspiration for monochrome portraits, check out Ransom Riggs’s eerie photo collections. If certain colors stand out too much, you can use the Selective Color tool in Photoshop to remove them. Desaturation comes in handy when you use artificial light. Some lights are too blue or too yellow. This can make your Halloween photography look unflattering. To fix this, simply desaturate the blues/oranges in your photos. This will put the focus on your model without forcing you to desaturate your entire image. You can make your Halloween photography look older and creepier by adding textures in Photoshop. Dust, scratches, and cracks can all significantly enhance a simple Halloween picture. Open the texture in the same file as your photo, change the layer mode to Screen, and adjust the opacity.
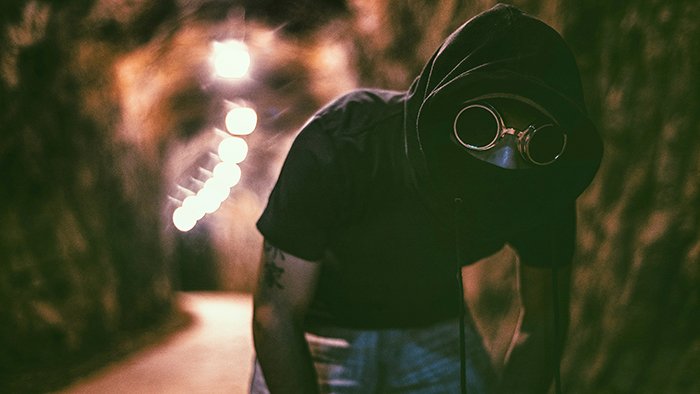
6. Think Outside the Box When It Comes to Costumes and Face Paint
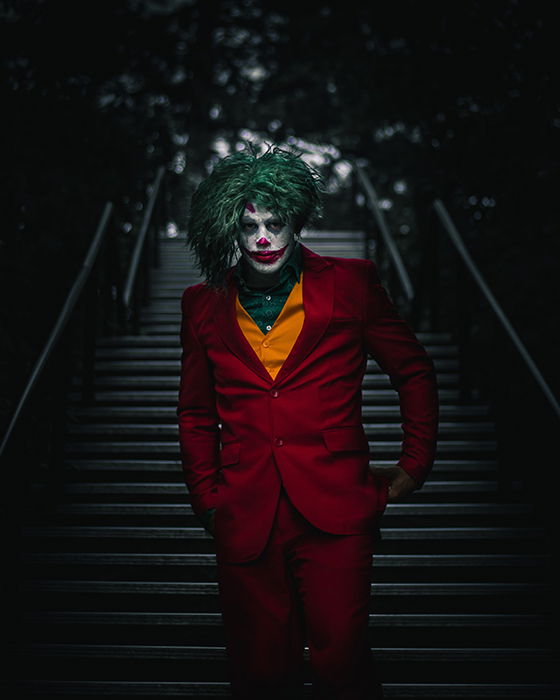
In the latest Joker movie, there’s an iconic scene featuring the character on a set of stairs. This photograph perfectly re-creates that without completely copying the scene. Including references like this in your Halloween photography will make them look both spooky and original. The quality of your model’s costume and face paint needs to be great. The more realistic it looks, the spookier your photos will be. Also, the more unique your costume idea, the easier it will be to take unusual Halloween photography. You can take inspiration from pop culture: Stranger Things, IT, Joker, and other popular horror films/shows. You can re-create your favourite scenes or come up with original ideas of your own. Pay attention to facial expressions. You can create a creepy atmosphere by asking your model to smile in an abandoned location. For something that looks more threatening, ask your model to look intensely into the camera without smiling. This is a great way to improve your cosplay and horror photography.
7. Shoot from Unusual Angles to Catch Viewers’ Attention
The more unusual the angle, the spookier your pictures will look. This is because people are used to seeing specific angles. If you experiment with something unexpected, you’ll find it easier to attract people to your work. Try shooting from a very low angle when you photograph people. This will make them look bigger and scarier. Don’t shoot right above your subject or else they’ll look very small. You can also shoot from a distance to capture your model and their surroundings. The less visible their face is, the eerier your Halloween photography will look. For a spooky distorted effect, use a wide-angle lens and get as close to your subject as possible.
8. Use Limited Light to Create a Haunting Atmosphere
Halloween is all about low light. You can take sharp nighttime pictures as long as you use the right equipment. When it comes to lighting, you can use lamps, torches, or even candles. If your light source isn’t bright enough, don’t be afraid of using a high ISO number. To avoid shakiness, put your camera on a tripod and use a remote to take pictures from a distance. If you want to use natural light, take photos next to a window. Make sure there are no other light sources around. The soft natural light will make part of your subject’s face visible. Everything else will naturally fade into the dark, creating a beautiful transition. For an extra creepy effect, use masks. Don’t be afraid of experimenting with unusual lighting techniques. Since Halloween photography isn’t focused on beauty, you can play with dark shadows and highlights as much as you want. For example, you can light your subject from above to create threatening shadows on their face. You can this even further by photographing your models in front of dark backgrounds. This will put the focus on their costumes only.
9. Photograph Pets in Costumes to Add a Touch of Cuteness to Your Photos
One of the best parts about Halloween is getting to try out different costumes with friends and pets! Find a few costumes that make your pet feel comfortable. Have some treats ready so that they don’t get bored. Pick a photoshoot location that’s familiar. If needed, you can build a quick studio so that the Halloween spirit is more obvious. You can simply shoot in front of a black and orange backdrop made of paper. You can also put a few pumpkins next to your pet for a fool-proof photoshoot. Make sure the lighting is as good as possible during your photoshoot. Avoid using flash or anything that might scare your pet. You can use natural window light instead. To capture great poses, hold your pet’s favorite toy right above your lens. This will keep them distracted and focused.
10. Use Spooky Effects in Photoshop to Make Your Halloween Pictures Stand Out
Once all of your photos are ready, you can enhance them even more. You can use a few simple editing tricks to take your Halloween photography to the next level:
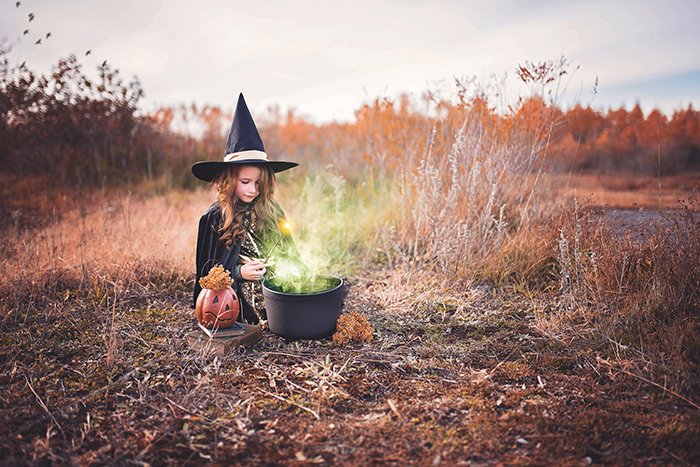
Decrease the color temperature in your photos. Cooler tones tend to look sadder or scarier, depending on the theme. Create glowing lights using the Blending Mode in Photoshop. You can use this to make fake wands look like they’re glowing. Add fake smoke to cauldrons to make it seem like your subjects are real witches! If you need more editing inspiration, you can use terrifying horror photos as a reference.
Conclusion
Halloween photography can be terrifying, adorable, or thought-provoking. It all depends on your model, lighting, props, and editing choices. Don’t be afraid to play around with different elements to create a diverse collection of Halloween photos. With our Halloween photography tips, you’ll be able to enjoy the holiday and take wonderfully spooky images.


title: “10 Great Tips To Shoot Scary Halloween Photography” ShowToc: true date: “2023-02-13” author: “Clinton Woomer”
You can take creepy photos of anything with the help of moody lighting, scary locations, and props. Here are some of our Halloween photography tips.
1. Halloween Photography: Shoot Through Fabric to Create Ghostly Silhouettes
For this Halloween-inspired picture, I used a light diffuser. The material is very light and soft, which makes it perfect for abstract silhouettes. You can use a similar material to photograph objects and animals. You can also use curtains or large sheets of paper. When you shoot through a semi-transparent material, everything on the other side looks ghostly. This is an easy way to make any Halloween photography portrait look creepy and surreal. Make sure you shoot against a bright light source. The brighter it is, the more the silhouette will stand out. If your model touches the material, their face will be more visible. Feel free to experiment with different poses and expressions.
2. Take Photos in Abandoned Places to Set the Mood
This abandoned house would look even spookier if it were dark outside. For perfect Halloween photography results, take photos when it’s cloudy or gloomy. Make sure there’s enough light for you to sharply photograph your subject. Try taking Halloween photography during the blue hour for a haunting blue effect. Find a location that complements your theme. The right location and weather will set the mood for your entire photoshoot. If you’re taking portraits, your model might find it easier to pose in a location that gives them strong Halloween vibes. If you don’t have a theme, you can use simple Halloween-related terms like:
abandoned hospital ghost stories getting lost; or pumpkin patch.
Once you have a theme, you can find an appropriate location. You should stay away from old houses or anything that could hurt you. If you find an abandoned building, don’t go inside. You can still get fantastic Halloween photography results if you take photos next to a building.
3. Take Your Halloween Photography to the Next Level with Fun Photography Tools
For unique Halloween images, put a smoke bomb in a jack-o’-lantern. This will make it seem like there’s a ghost leaving the pumpkin! Perfect for fun family photoshoots. Carved pumpkins, fake blood, and candles are all a normal part of Halloween. If you photograph them on your own, you’ll get Halloween pics that are beautiful but not original. To take your still life Halloween photo to the next level, you can use cheap photography tools. Here are a few ideas:
Smoke bombs: These handy tools come in every color imaginable. You can combine Halloween colors, like black and orange, to make any still life photo pop. Put smoke bombs in pumpkins, hats, and anything else that deserves to look spookier. (Avoid using smoke bombs indoors or in places with flammable objects.) Bokeh filters: You can either buy these online or make them yourself. Bokeh photography filters change the shape of bokeh into anything you like. For a fun Halloween shoot, you can use bat, pumpkin, and ghost filters. Cling film: Cover your lens with plastic wrap. You can crumple it up to create more texture. This will create a blurred effect that’s perfect for surreal Halloween photography.
4. Capture Creepy Movements with Motion Blur
Halloween is often associated with ghosts. You can take advantage of this theme with the help of motion blur or long exposure photography. Place your camera on a tripod and take photos with a slow shutter speed. The slower it is, the blurrier your image will look. This is a great way to capture different movements and make your Halloween photo look abstract. For a stronger effect, don’t use a tripod. You can use motion blur techniques like panning and zooming to give your pictures an eerie feel.
5. Desaturate Your Photos to Make Them Look Scarier
If you look up spooky Halloween photography online, you’ll notice that most of them aren’t that colorful. The older a photo looks, the spookier it becomes. If you want inspiration for monochrome portraits, check out Ransom Riggs’s eerie photo collections. If certain colors stand out too much, you can use the Selective Color tool in Photoshop to remove them. Desaturation comes in handy when you use artificial light. Some lights are too blue or too yellow. This can make your Halloween photography look unflattering. To fix this, simply desaturate the blues/oranges in your photos. This will put the focus on your model without forcing you to desaturate your entire image. You can make your Halloween photography look older and creepier by adding textures in Photoshop. Dust, scratches, and cracks can all significantly enhance a simple Halloween picture. Open the texture in the same file as your photo, change the layer mode to Screen, and adjust the opacity.
6. Think Outside the Box When It Comes to Costumes and Face Paint
In the latest Joker movie, there’s an iconic scene featuring the character on a set of stairs. This photograph perfectly re-creates that without completely copying the scene. Including references like this in your Halloween photography will make them look both spooky and original. The quality of your model’s costume and face paint needs to be great. The more realistic it looks, the spookier your photos will be. Also, the more unique your costume idea, the easier it will be to take unusual Halloween photography. You can take inspiration from pop culture: Stranger Things, IT, Joker, and other popular horror films/shows. You can re-create your favourite scenes or come up with original ideas of your own. Pay attention to facial expressions. You can create a creepy atmosphere by asking your model to smile in an abandoned location. For something that looks more threatening, ask your model to look intensely into the camera without smiling. This is a great way to improve your cosplay and horror photography.
7. Shoot from Unusual Angles to Catch Viewers’ Attention
The more unusual the angle, the spookier your pictures will look. This is because people are used to seeing specific angles. If you experiment with something unexpected, you’ll find it easier to attract people to your work. Try shooting from a very low angle when you photograph people. This will make them look bigger and scarier. Don’t shoot right above your subject or else they’ll look very small. You can also shoot from a distance to capture your model and their surroundings. The less visible their face is, the eerier your Halloween photography will look. For a spooky distorted effect, use a wide-angle lens and get as close to your subject as possible.
8. Use Limited Light to Create a Haunting Atmosphere
Halloween is all about low light. You can take sharp nighttime pictures as long as you use the right equipment. When it comes to lighting, you can use lamps, torches, or even candles. If your light source isn’t bright enough, don’t be afraid of using a high ISO number. To avoid shakiness, put your camera on a tripod and use a remote to take pictures from a distance. If you want to use natural light, take photos next to a window. Make sure there are no other light sources around. The soft natural light will make part of your subject’s face visible. Everything else will naturally fade into the dark, creating a beautiful transition. For an extra creepy effect, use masks. Don’t be afraid of experimenting with unusual lighting techniques. Since Halloween photography isn’t focused on beauty, you can play with dark shadows and highlights as much as you want. For example, you can light your subject from above to create threatening shadows on their face. You can this even further by photographing your models in front of dark backgrounds. This will put the focus on their costumes only.
9. Photograph Pets in Costumes to Add a Touch of Cuteness to Your Photos
One of the best parts about Halloween is getting to try out different costumes with friends and pets! Find a few costumes that make your pet feel comfortable. Have some treats ready so that they don’t get bored. Pick a photoshoot location that’s familiar. If needed, you can build a quick studio so that the Halloween spirit is more obvious. You can simply shoot in front of a black and orange backdrop made of paper. You can also put a few pumpkins next to your pet for a fool-proof photoshoot. Make sure the lighting is as good as possible during your photoshoot. Avoid using flash or anything that might scare your pet. You can use natural window light instead. To capture great poses, hold your pet’s favorite toy right above your lens. This will keep them distracted and focused.
10. Use Spooky Effects in Photoshop to Make Your Halloween Pictures Stand Out
Once all of your photos are ready, you can enhance them even more. You can use a few simple editing tricks to take your Halloween photography to the next level:
Decrease the color temperature in your photos. Cooler tones tend to look sadder or scarier, depending on the theme. Create glowing lights using the Blending Mode in Photoshop. You can use this to make fake wands look like they’re glowing. Add fake smoke to cauldrons to make it seem like your subjects are real witches! If you need more editing inspiration, you can use terrifying horror photos as a reference.
Conclusion
Halloween photography can be terrifying, adorable, or thought-provoking. It all depends on your model, lighting, props, and editing choices. Don’t be afraid to play around with different elements to create a diverse collection of Halloween photos. With our Halloween photography tips, you’ll be able to enjoy the holiday and take wonderfully spooky images.
